In a world where every second of website downtime can mean lost customers, revenue, and credibility, having a reliable Uptime monitor is a must. Whether you’re a business owner, developer, or digital marketer, monitoring your website’s uptime is no longer optional, it’s essential.
But what if setting up an advanced uptime monitoring system didn’t require hours of coding or technical knowledge? With modern tools, you can get everything up and running in just a few minutes.
In this article, we’ll walk you through exactly how to set up a powerful uptime monitoring system quickly and effectively with no experience required.
What Is an Uptime Monitor?
An uptime monitor is a tool that checks whether your website or server is available and functioning correctly. It continuously tests your website at regular intervals every minute or even every few seconds and alerts you the moment it goes down.
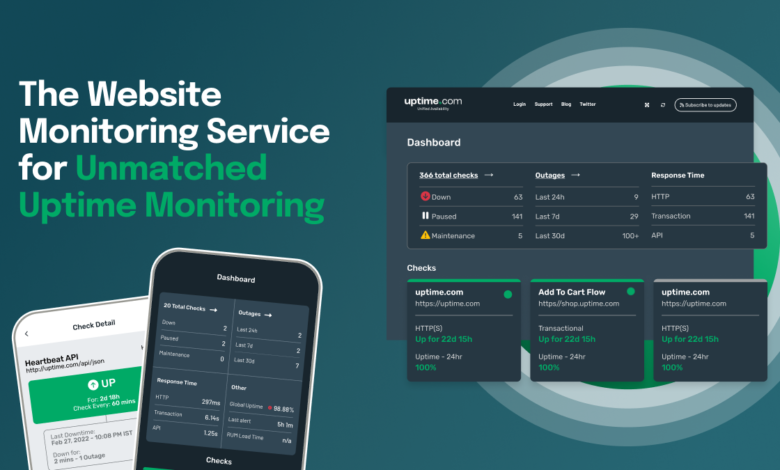
Most uptime monitoring services go beyond basic availability checks. They monitor page speed, SSL certificate validity, server response time, and more. Some even allow you to share public status pages with your customers for full transparency.
Why You Need One
Even the best websites experience occasional outages due to server issues, hosting problems, DDoS attacks, software bugs, or expired SSL certificates. Without a monitor in place, you may not even know your site is down until hours later after you’ve lost traffic or customers.
An uptime monitor gives you peace of mind, knowing that you’re always the first to know when something goes wrong.
Step-by-Step Guide to Setting Up an Advanced Uptime Monitor
Let’s break it down into simple steps:
Step 1: Choose the Right Uptime Monitoring Tool
Start by selecting a monitoring service that suits your business needs. Look for tools that offer:
1-minute check intervals
Multiple monitoring locations
SMS/email/push alerts
SSL monitoring
Public status page support
API access (for integration)
Performance graphs and logs
Many of these services offer free plans with basic functionality, making them ideal for startups and small businesses.
Step 2: Create Your Account
Visit the tool’s official website and sign up with your email address. You’ll typically receive a verification link. After confirming, you’ll gain access to the dashboard where you can set up your first monitor.
Step 3: Add Your Website or Server
Click “Add Monitor or a similar option on the dashboard. You’ll be asked to fill in:
Monitor name (e.g., My Business Website)
Monitor type (HTTP, HTTPS, TCP, Ping, etc.)
Website URL or IP address
Monitoring interval (e.g., every 1 minute)
Alert contacts (email, SMS, app notification)
Click save, and the system will immediately begin checking your site’s availability.
Step 4: Set Up Notifications
Configure how you’d like to be notified if something goes wrong. Most services let you choose from multiple options:
Email alerts for quick updates
SMS alerts for high-priority issues
Mobile push notifications through an app
Webhook integrations for Slack, Microsoft Teams, or Discord
Voice calls in severe outage cases
You can often set different rules for business hours and non-business hours, assigning alerts to different team members as needed.
Step 5: Monitor SSL Certificates and Performance
Modern uptime monitoring tools allow you to monitor more than just availability. You can also enable:
SSL Certificate Monitoring – get alerts when your SSL is about to expire
Page Speed Monitoring – track loading times and identify slowdowns
Port Monitoring – track specific server ports (e.g., email or FTP)
Keyword Monitoring – get alerts if expected text disappears from your site (useful for tracking content errors or defacements)
Step 6: Review Logs and Reports
Once your monitor is active, check the logs for real-time and historical data. You’ll be able to see:
Uptime percentage (e.g., 99.99%)
Response time (in milliseconds)
Incident history (outages, errors, recoveries)
Geographic data (which locations noticed the outage)
This information is key to identifying patterns and fixing recurring problems.
Step 7: Share a Public Status Page
Most uptime monitoring services let you create a public status page that customers or team members can view. This page shows whether your systems are online and displays incident history.
You can customize the page with your logo, colors, and messaging to match your brand identity. It’s a great way to build customer confidence during technical issues.
Here’s where a Uptime monitor really shines by giving you total control over transparency.
Tips for Better Uptime Monitoring
Set alert thresholds wisely: Don’t get notified on every minor issue. Use alert rules to avoid unnecessary noise.
Test from multiple locations: Outages may happen only in certain regions using global monitoring.
Include team members: Make sure your DevOps, marketing, or customer support teams also get alerts.
Regularly review performance data: Identify long-term issues like slow servers or frequent SSL errors.
Use mobile apps: Stay connected and get alerts on the go.
The Role of Uptime Monitoring in 2025
As more businesses rely entirely on digital platforms, uptime monitoring has become a fundamental layer of online operations. Whether you run an online store, a mobile app, a SaaS platform, or a corporate site downtime damages your reputation.
In 2025, automation and real-time data are king. Website monitoring tools now use AI to predict failures before they happen and offer insights to proactively fix weak points. Integrating these tools ensures higher service availability and a better user experience.
Read Also: Top-Rated Youtube Monitoring: Essential Solutions for Modern Brands
Final Thoughts
Setting up a professional uptime monitoring system doesn’t require technical expertise or a huge budget. With just a few clicks and minutes of setup, you can get real-time protection against website downtime and performance issues.
An uptime monitor gives you the power to respond faster, protect your reputation, and maintain high levels of customer satisfaction. In a fast-paced digital world, that’s not just helpful, it’s essential.
Whether you’re a beginner or an expert, taking the time to set up this tool is one of the smartest decisions you can make for your online presence.